Analyze landing page metrics with PostHog
PostHog is an open-source product analytics platform that tracks website traffic, user behavior, and engagement metrics. Sliq connects to PostHog so your AI assistant can give you daily traffic digests, answer questions about your landing page performance (top pages, traffic sources, bounce rate), and run custom queries — all from chat.
This guide walks you through setting up PostHog from scratch and connecting it to Sliq.
Create a PostHog account
Go to posthog.com and sign up for a free account.
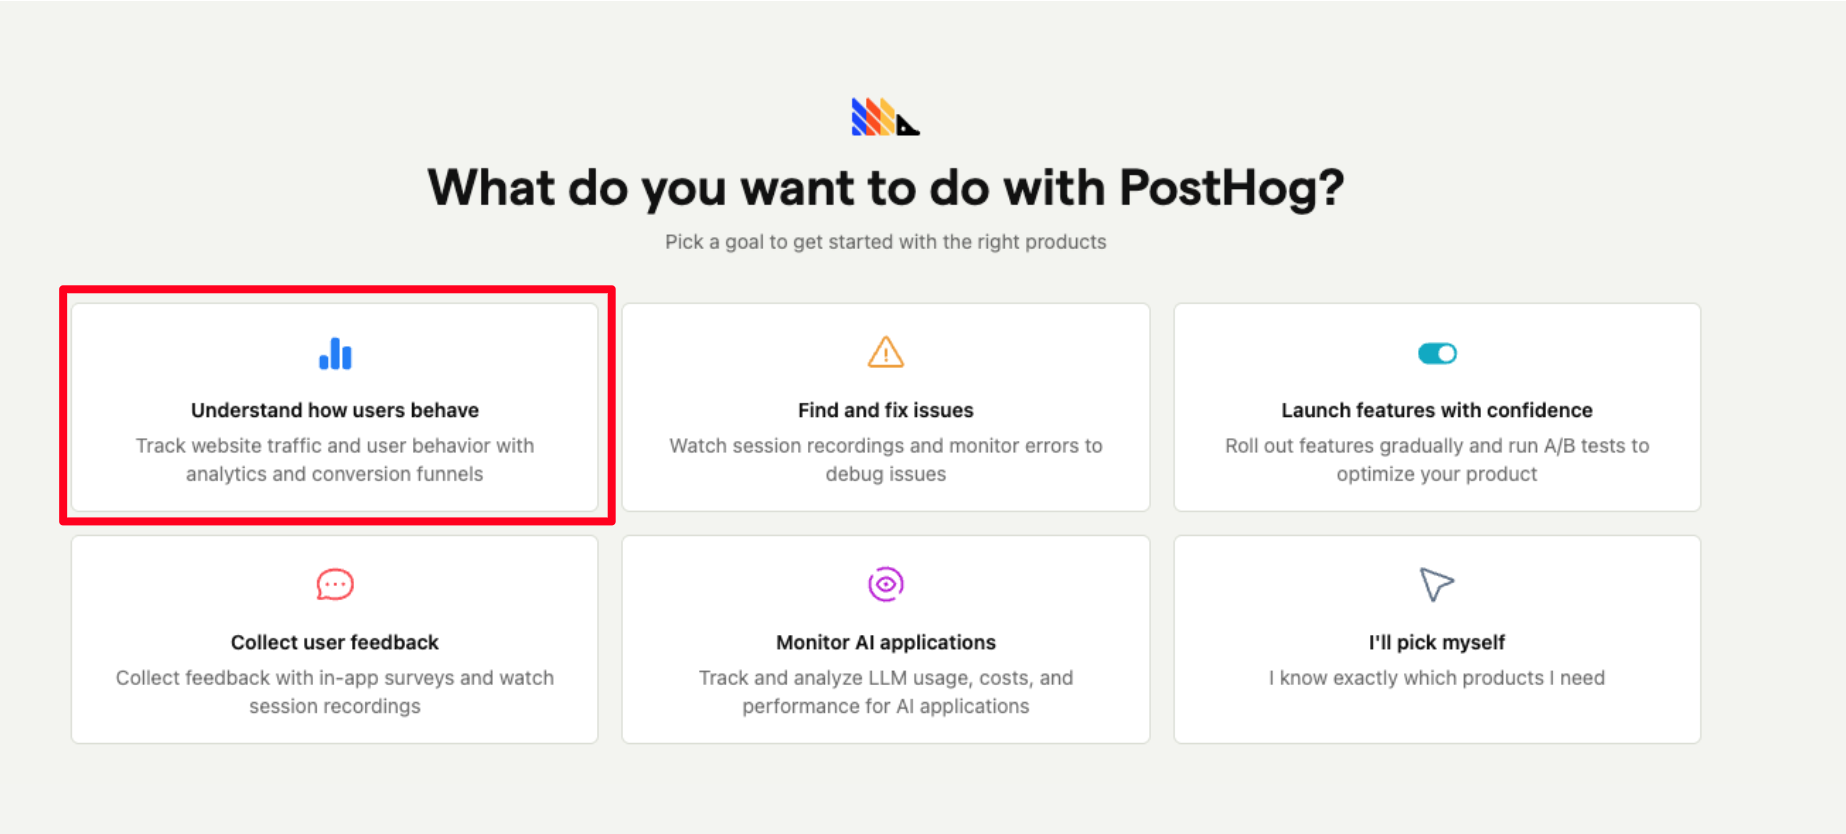
When asked "What do you want to do with PostHog?", select Understand how users behave.
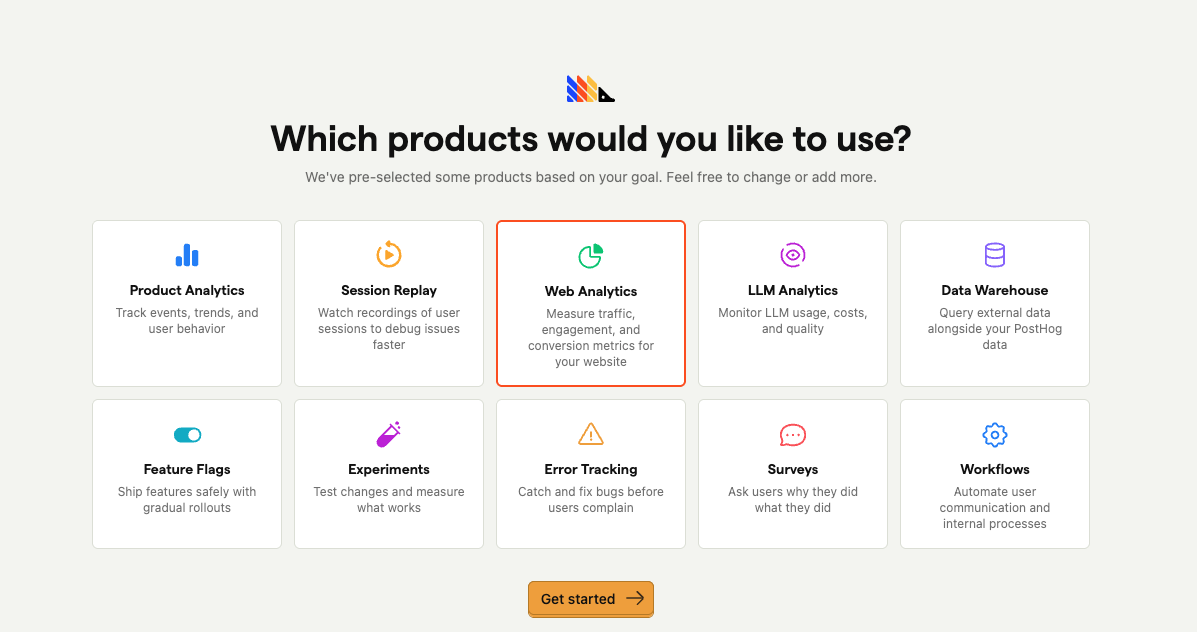
- On the product selection screen, select Web Analytics only. You can deselect everything else (Product Analytics, Session Replay, etc.) — Sliq only needs web analytics data.
Install PostHog on your website
This is the most important step. PostHog needs a JavaScript snippet on your website to collect pageview and click data. Without it, there's no data for Sliq to read.
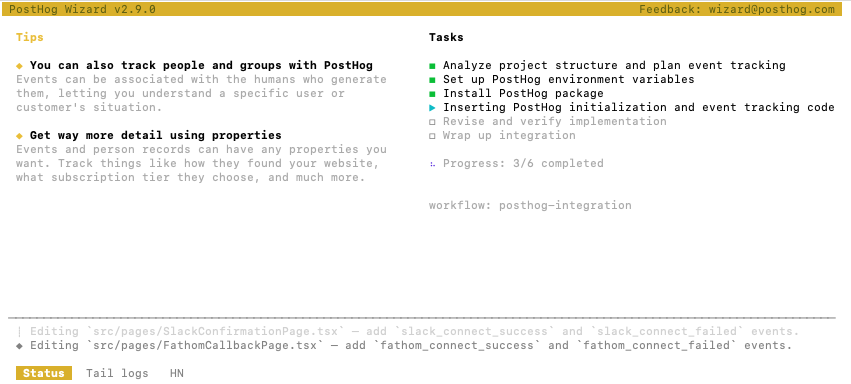
PostHog provides a wizard that auto-detects your framework and installs the SDK for you. Run this from your website project's root directory:
npx -y @posthog/wizard@latest
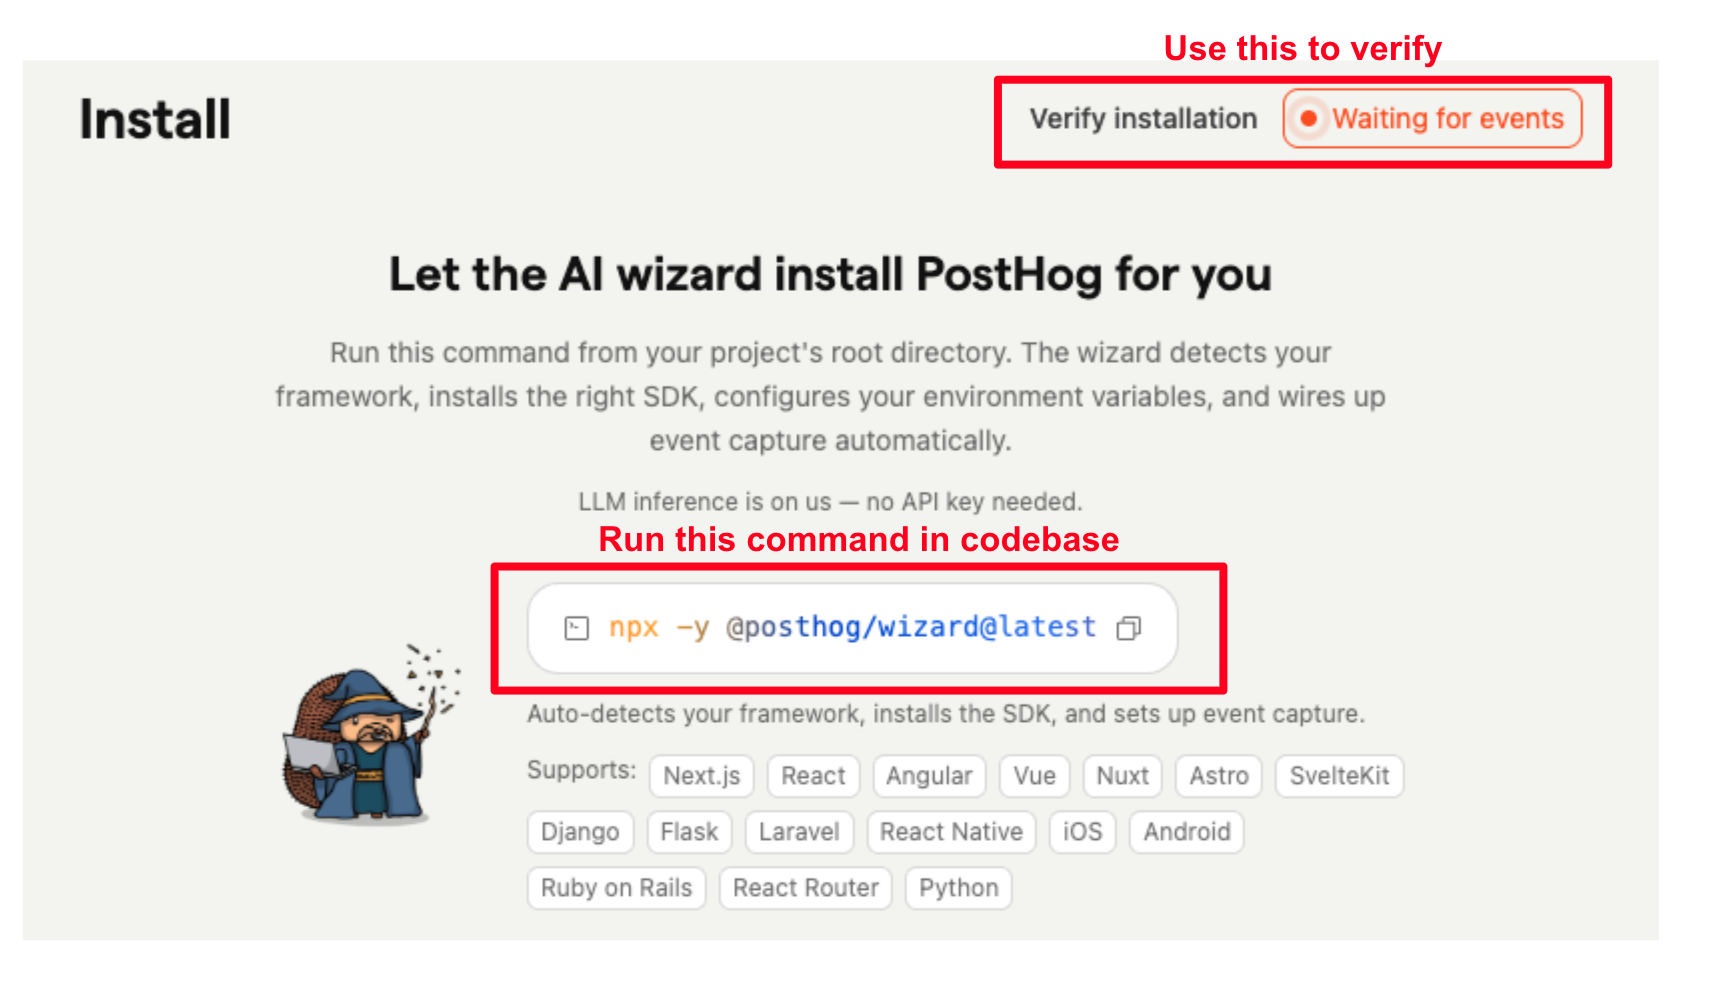
The wizard will auto-detect your framework, install the PostHog package, and set up event tracking in your code. Just follow the prompts — it supports Next.js, React, Vue, Nuxt, Astro, SvelteKit, Angular, Django, Flask, and more.
Note: Run this in your website's codebase, not in Sliq. This installs PostHog's tracking snippet on your site so it can start sending analytics events.
The wizard will detect your project directory and framework, then ask you to continue:
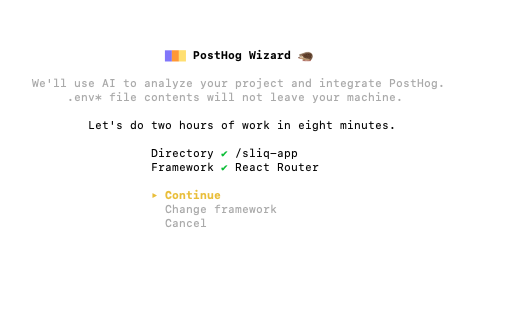
The wizard will analyze your project, install the PostHog package, and insert tracking code automatically. This takes a few minutes.
The wizard may ask if you want to install the PostHog MCP server for your code editor. This is optional and not required for the Sliq integration — feel free to install it if you'd like to query PostHog from your editor, or skip it.
When you see "PostHog integration complete", you're done with this step.

Configure tracking options
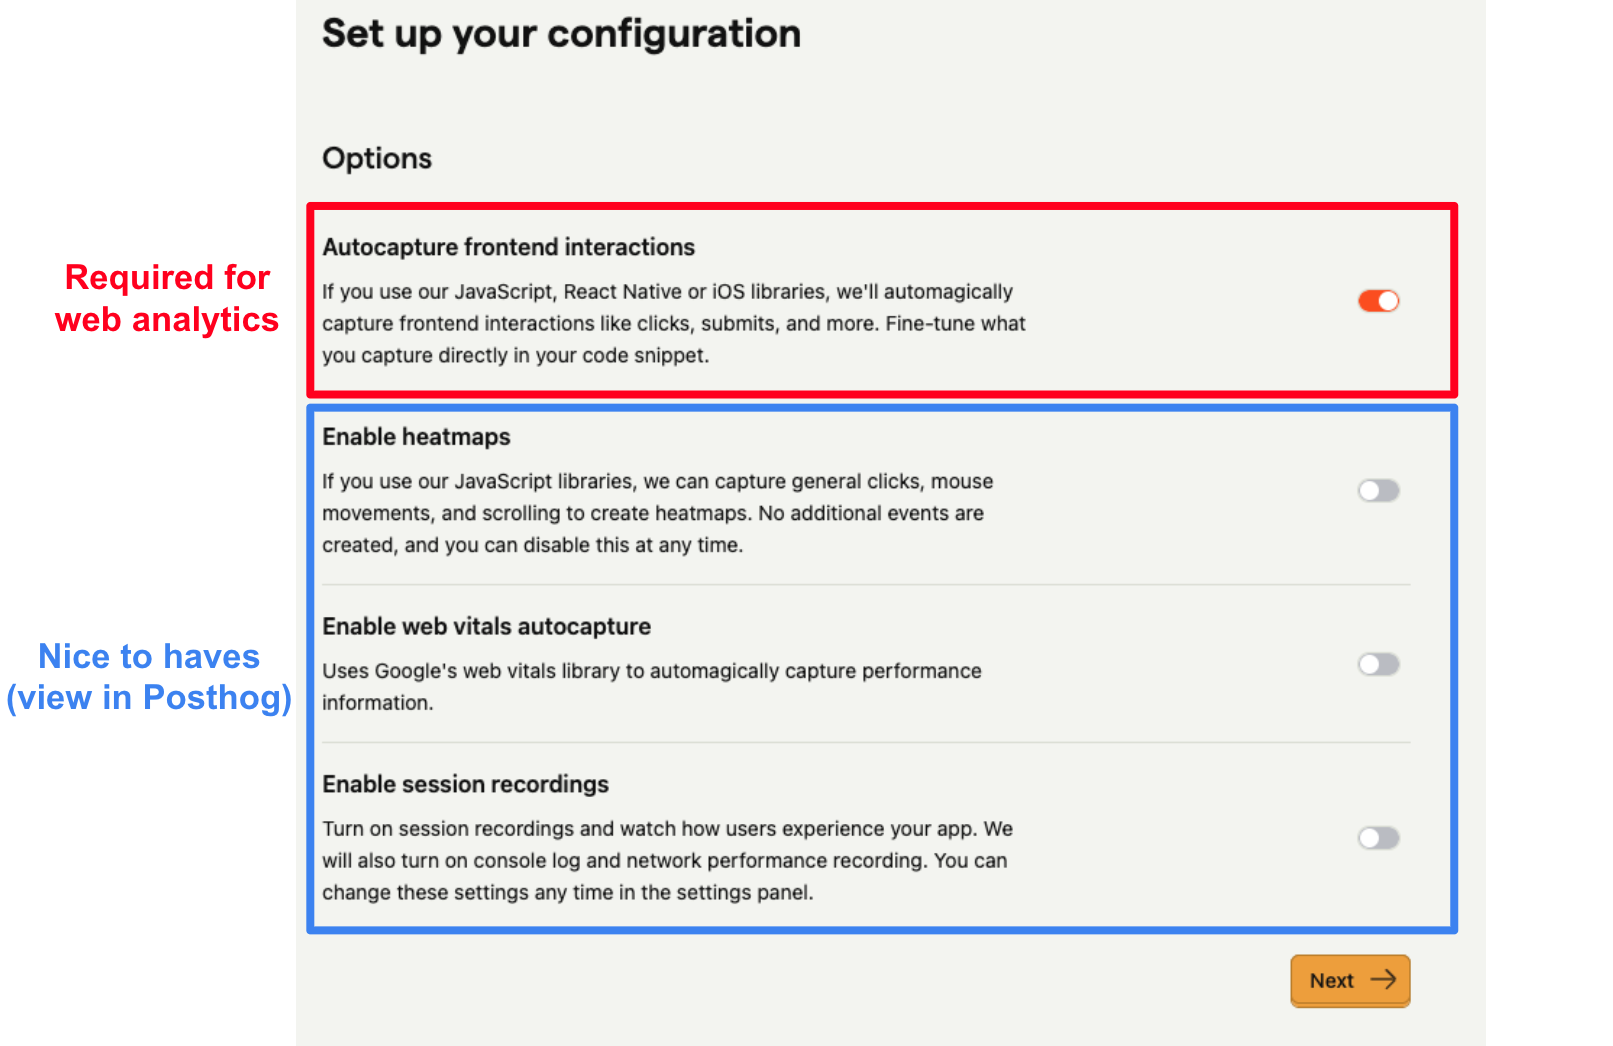
PostHog will ask which tracking features to enable. Here's what each one does:
Autocapture frontend interactions (required) — Automatically captures clicks, form submits, and other interactions on your site. Sliq uses this data to show you which buttons and links your visitors click most. Make sure this is on.
Enable heatmaps (optional) — Captures mouse movements and scrolling to generate visual heatmaps of where users click and look. Useful if you want to see engagement patterns visually in PostHog, but Sliq doesn't use this data.
Enable web vitals autocapture (optional) — Tracks page load performance metrics (Largest Contentful Paint, First Input Delay, etc.) using Google's web vitals library. Helpful for monitoring site speed, but not used by Sliq.
Enable session recordings (optional) — Records video-like replays of user sessions so you can watch exactly how visitors navigate your site. Great for debugging UX issues, but not used by Sliq and can add to your PostHog bill at high traffic volumes.
Add your domain
After installation, PostHog will ask you to add Authorized Domains. Add your production website URL (e.g., https://www.yoursite.com). This tells PostHog which domains to track for Web Analytics.
Verify analytics in production
After deploying, visit your production website in a browser, then go to Web Analytics in PostHog's left sidebar. You should see your visit show up within a minute or two — pageviews, visitors, and traffic sources will start appearing.
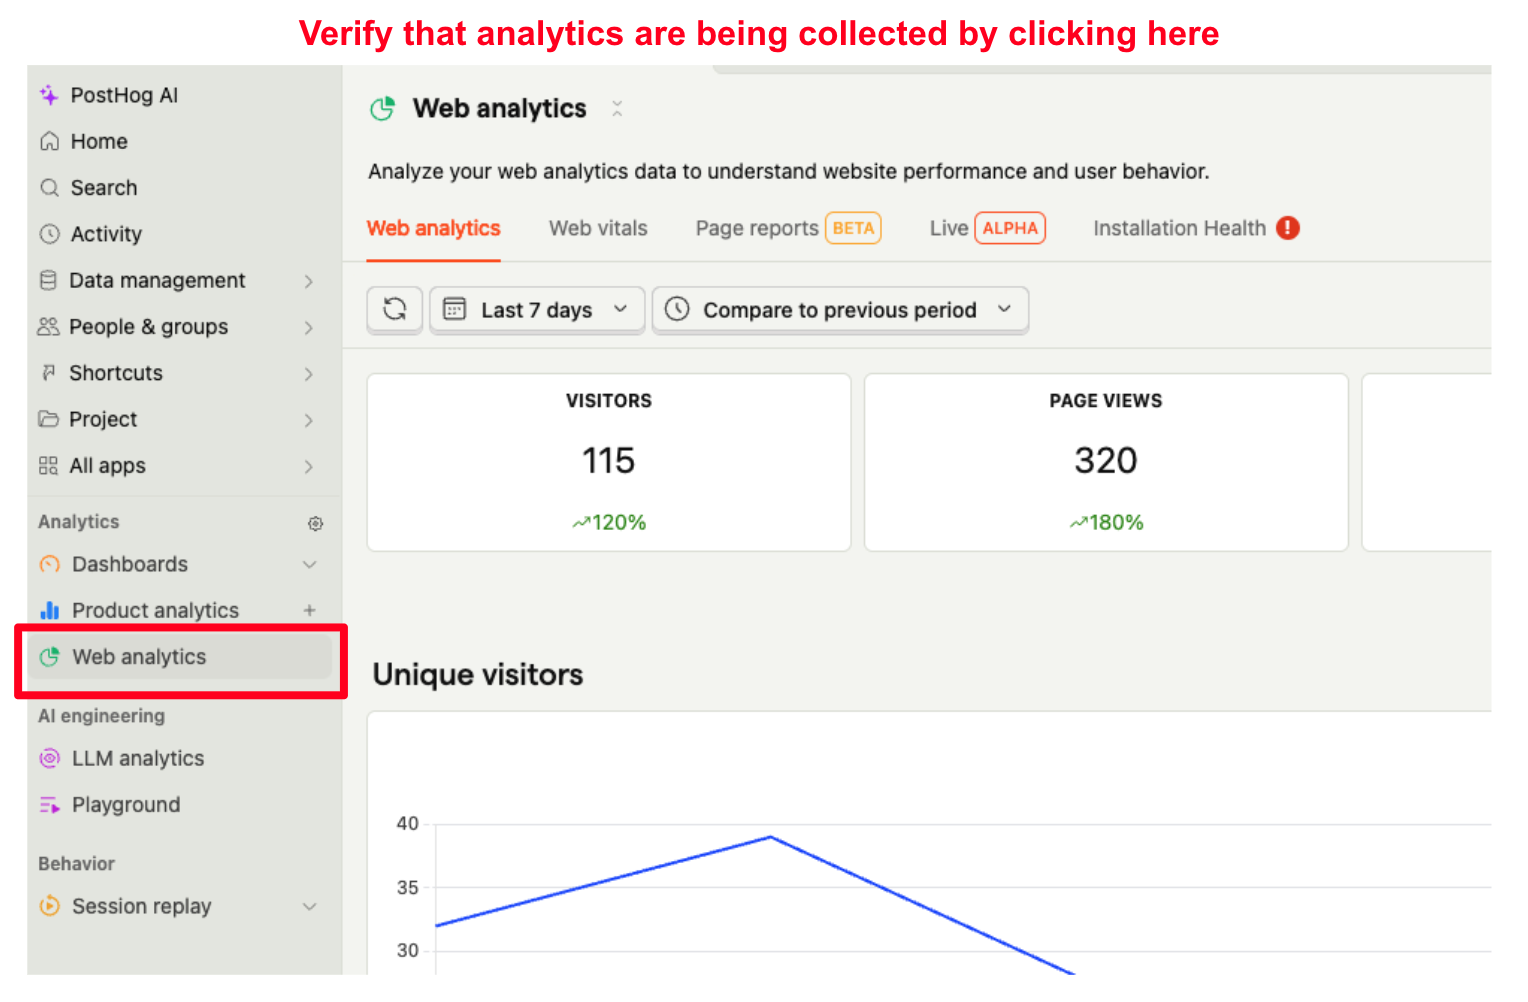
If the Web Analytics page shows data, you're ready to connect to Sliq.
If it's empty, open your browser's DevTools (Network tab) on your production site and look for requests going to us.i.posthog.com — if you don't see any, the snippet isn't firing and you may need to re-run the install wizard or check your deployment.
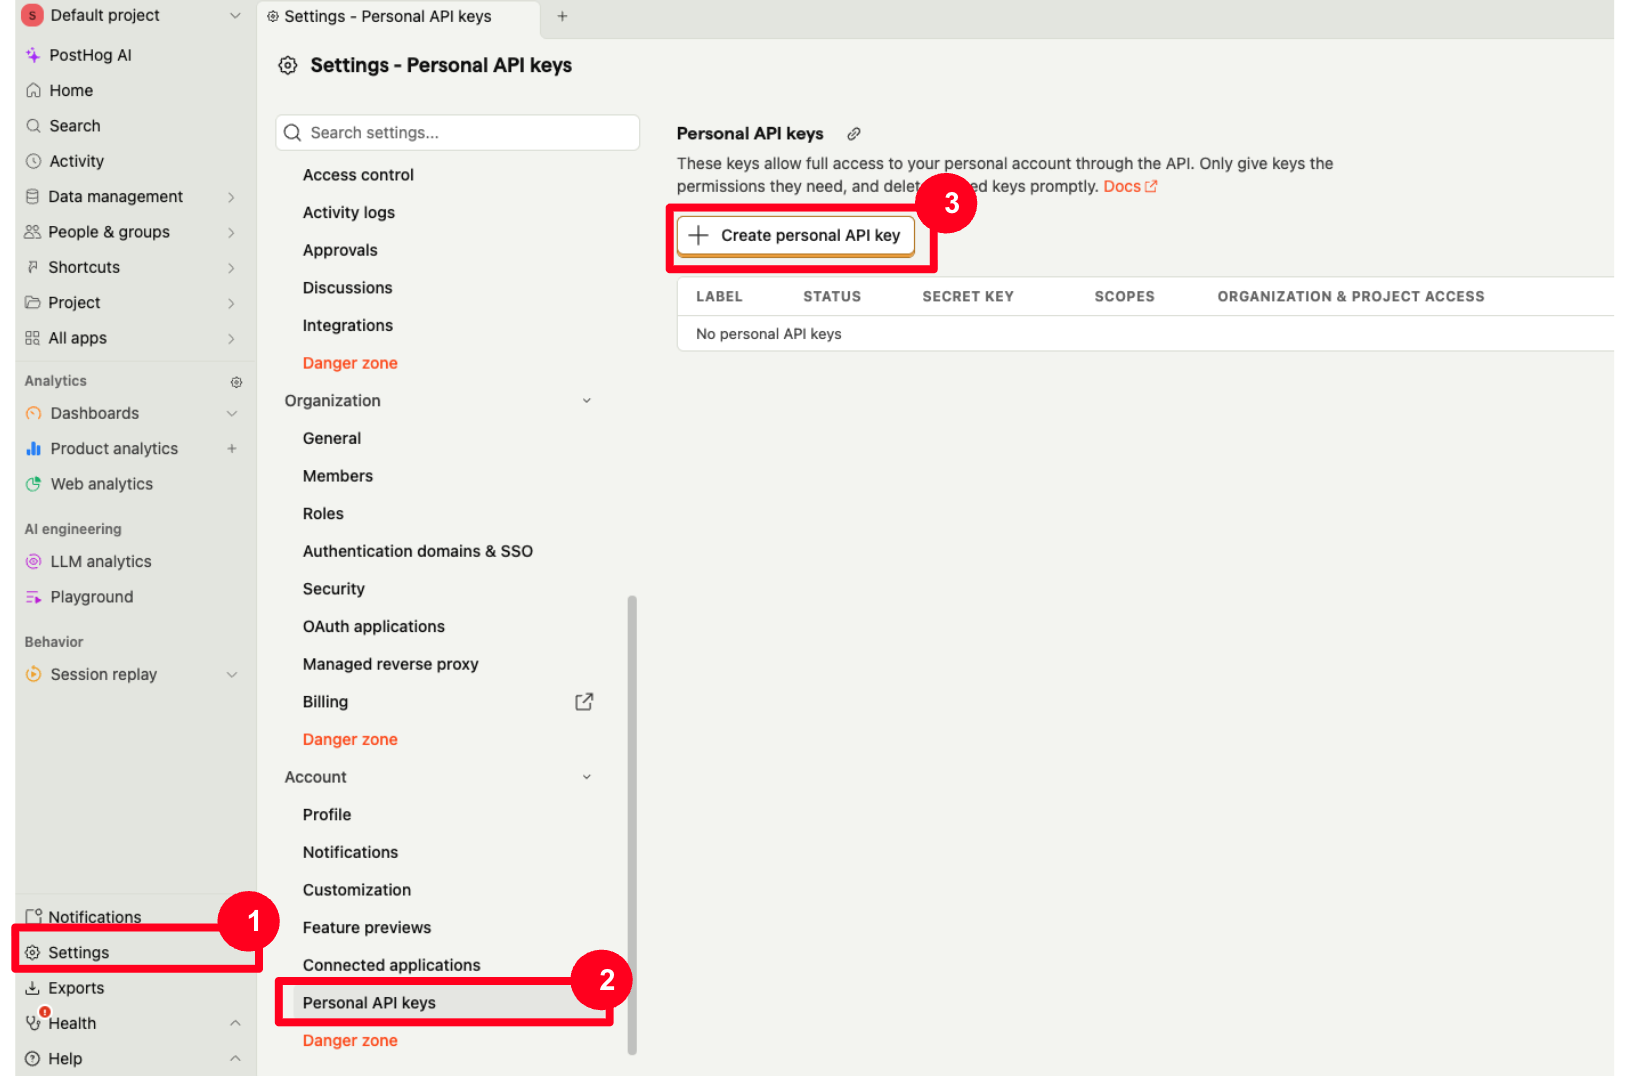
Create a Personal API key
Sliq connects to PostHog via a Personal API key. Here's how to create one:
- In PostHog, go to Settings > Personal API Keys (or go directly to posthog.com/settings/user-api-keys). Click Create personal API key.
- Configure the key:
- Label: Give it a name like "Sliq"
- Organization & project access: Select Projects and pick the specific project you want to track. You don't need "All access".
- Scopes: Click the Performing analytics queries preset — this selects the
query:readscope, which is the only permission Sliq needs.
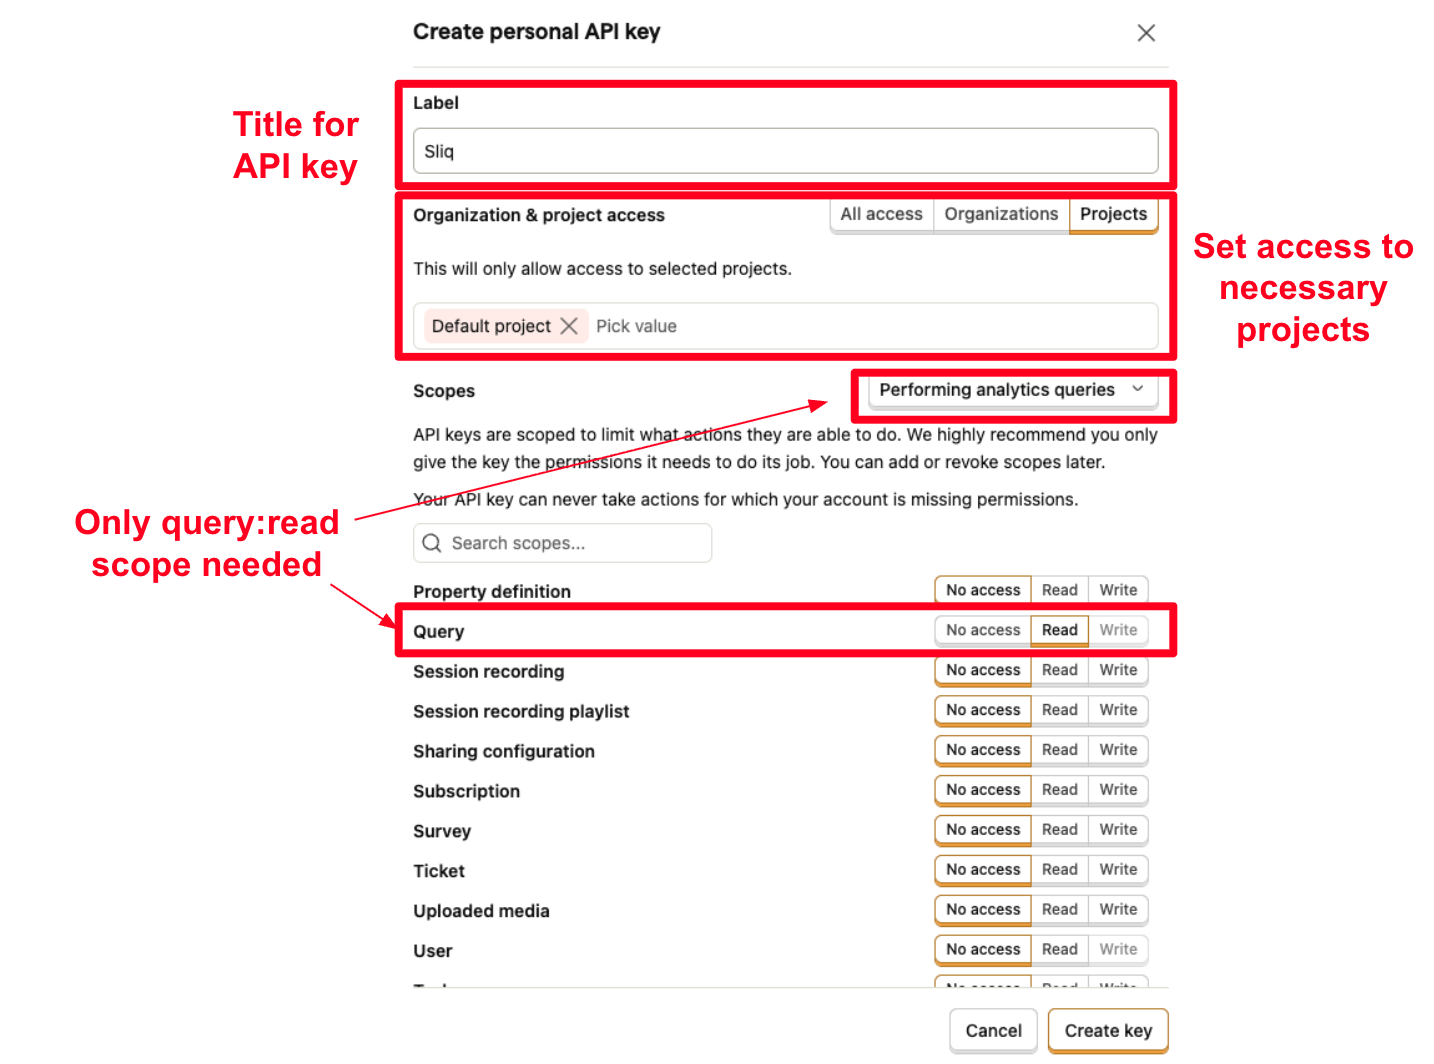
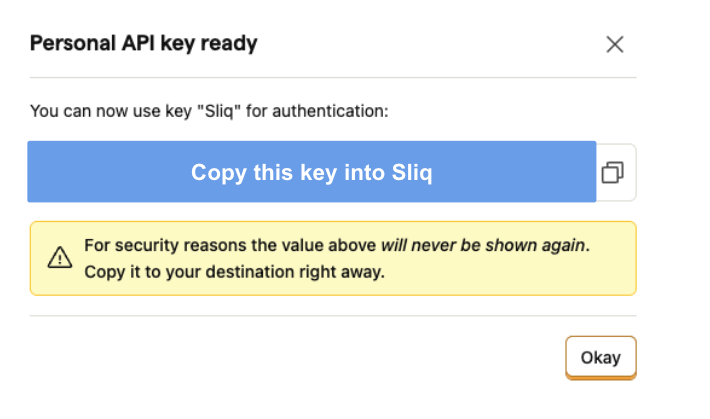
- Click Create key. A modal will appear with your key — copy it immediately. The key will never be shown again.
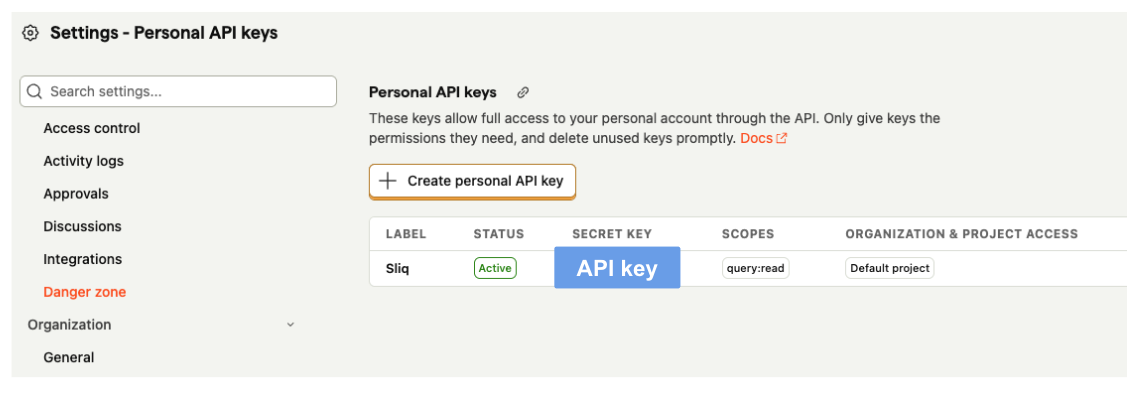
- Verify the key was created correctly. Back on the Personal API Keys page, you should see your "Sliq" key listed with Status: Active, Scopes: query:read, and the correct project access.
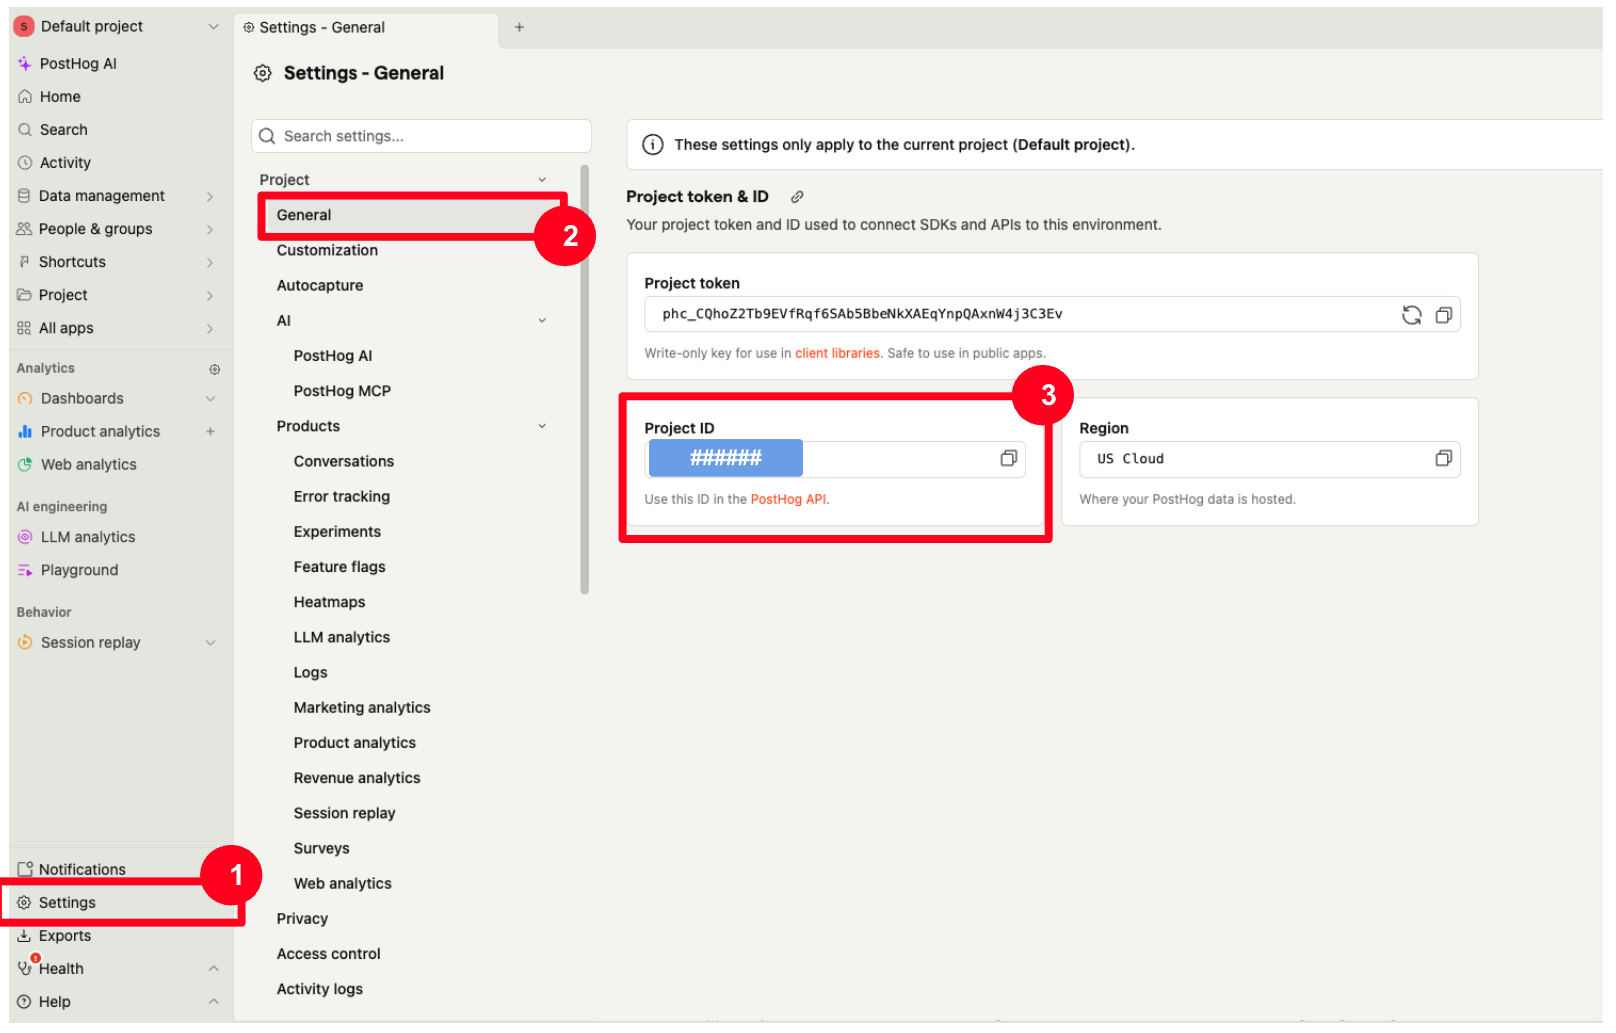
Find your project ID
In PostHog, go to Settings > General. Your Project ID is displayed under the "Project token & ID" section. Copy it — you'll paste it into Sliq in the next step.
Connect to Sliq
- From chat: If Sliq is walking you through setup, click the "Connect PostHog to Sliq" link in the chat — a modal will pop up where you can paste your API key and project ID.
- From Integrations: Go to the Integrations page in Sliq, find PostHog, click Connect, and enter your API key and project ID.
What you get
Once connected, Sliq can:
- Daily traffic overview — unique visitors, total pageviews, and daily trends
- Traffic sources — where your visitors are coming from (Google, Twitter, direct, etc.)
- Top pages — which pages get the most views
- Top clicks — which buttons and links visitors click most, with click rates
- Engagement metrics — average session duration and bounce rate
- Custom queries — ask your AI assistant anything about your traffic and it will query PostHog directly
You can also set up a daily analytics digest as an automated task in Sliq to get a summary delivered to Slack every morning.
Need help?
If you run into any issues, contact us at hello@getsliq.com or visit our support page.
Last updated: April 2026